Time to read 9 minutes
As we near to winter’s close, it is the perfect time to reflect on what worked well in the garden and what needs improvement as we look towards this year’s growing season.
At the end of January in USDA Plant Hardiness zone of 9a, UK, and before the garden wakes up from its winter slumber, it is time to take stock.
Below I will give some tips on what worked in my garden last year and detail some action plans for the upcoming grow season and beyond to get the most out the limited space on our homestead.
Growing food in the front yard
Last year I made use of the expansive space that is the front of the house.
In the UK people seldom utilize their front gardens in this way and as I understand it, in some areas in the US it is forbidden to use the front yard to grow food.
But to me, it seemed a shame not to because our facade gets a flood of light all afternoon so I here I decided to install a raised bed directly on the gravel in the same way I created my outdoor tortoise enclosure.
Filling raised beds cheaply
I lined the bottom 20cm or so with plain cardboard boxes that we had lying around.
This takes a few days as you have to dampen (or better yet, do this step when the forecast is for rain for a few days) the cardboard so it lies completely flat.
On top of that I put in unwanted organic matter like weeds, old sticks, branches etc from around my property and the immediate areas surrounding my home -my neighbours got a few weeks free weeding labour out of me!
I put in basically anything that was going in our and our neighbours’ green bin. Here’s a little more on how I did it.
Next I put in all the old, spent compost from around the garden and greenhouse that had been used to grow plants in the past that I had been saving for a while for this purpose.
By this point I had laid the foundations of my bed. I took the time to level it out with a rake but I knew that the organic layers below would soon break down to provide nutrients to my crop.
I then added a layer of farmyard manure to provide nutrients and condition the soil.
Then I added a mixture of coco coir (about 8 bricks, which you add warm water to and it fluffs up into the softest growing medium, great for starting seeds – and bonus points, it’s peat free and affordable!) and peat free compost for the remaining top layer that I would plant directly and sow seeds into.
A Successful Grow
This ended up being a great success. For the 6ft x 4ft planter, I divided into 24 sq ft plots where I managed to grow a variety of crops.
Square foot gardening- measuring things out and mapping it up using twine and screws was a very efficient and effective use of space.
It helped to keep plants separate and lets me easily see what space I had available at any given moment. It also looks good – and like you know what you’re doing, ha.
I think I started to plant up the bed in March and was harvesting way into November from mange tout, kale, nasturtium, spinach, lettuce and French beans- the main crops I had great success with succession planting this Summer so I will definitely continue that.
Flower Borders and Pots
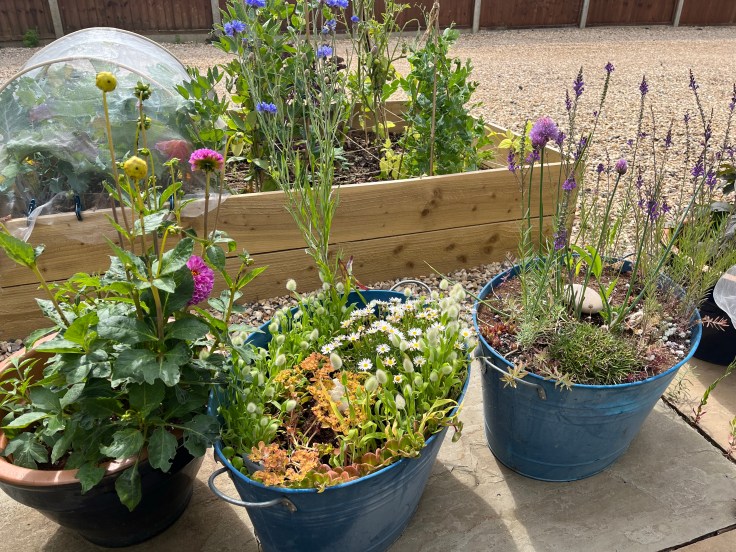
Another great addition last year were my flower borders, mostly containing roses- and dahlias for the tortoise.
Adding flowers to any garden doesn’t only look pretty and cheerful but is a good way to diversify plants to attract pollinators like bees, ladybirds and butterflies into the garden to in turn, help the plants we grow for food and other uses, successfully bear fruit.

Flowers for containers and pollinators
As well as my garden borders, I experimented with these blue mental planters that were discarded at the house when we moved in.
Related: How to Get Started with Container Gardening
Initially they contained some sedum and an unidentified succulent.
I freshened up the compost a little by adding a couple of handfuls of some fluffy coco coir, added some nitrogen fertiliser and a few weeks later planted some of the old flower seeds I have had in my possession for a few years and wanted to use up.
Think I planted some daisy, asters, cornflowers, bunny’s tails, chives etc in sections with the seeds and waited.
I really liked the way they came out. I find gardening to be an excellent outlet for creativity with minimal risk. If you fail, you just learn from it and move on.

The addition of a compost bin
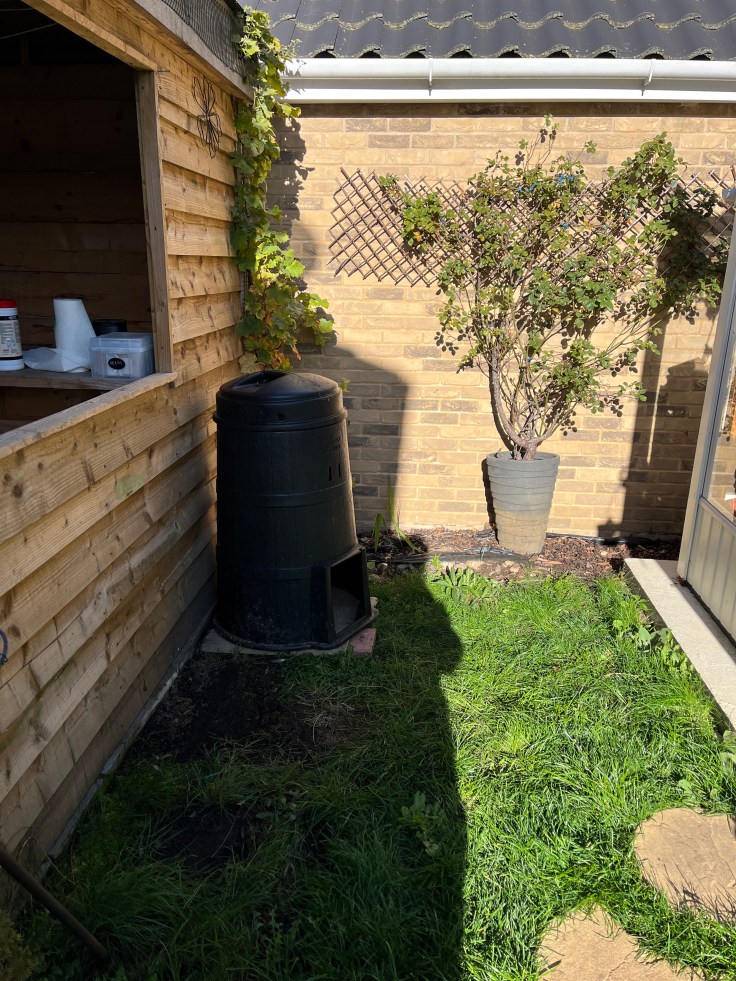
Adding a Compost bin
Composting is a must, if you garden. It just is.
In our old house, the compost bin that had been successfully making compost for years, was the unsung work-horse because it aids an element of sustainability to the home and garden.
I would have preferred to create an actual compost heap like my dear Dad kept, but we lack space and an opportunity presented itself. A friend of ours was chucking out this perfectly usable compost bin so I snapped it up.
All organic waste from the garden and the kitchen (uncooked, unused peelings compostable packaging, grass clippings etc) goes in which will break down for usable compost for my garden beds.
It takes a while for the compost to break down but the process can be aided with a good ratio of green (grass clippings, coffee grounds, organic tea bags etc and carbon rich brown material – think dead organic matter like brown paper, dead leaves) and regular turning with a garden fork. *self reminder to purchase some compost worms to assist!
Related: Should I Add Worms to the Compost Bin?

Some lessons I have learned and improvements I would like to implement this growing season.
Crop placement – by height not by fancy
In my excitement to plant into the 24sq. ft. plots, I did not really think about the placement of crops which I now know, makes a difference. D’oh.
I found that I had tall broccoli, corn and tomato plants shading the calendulas, seedlings and other plants that were closer to the ground.
This time around I will map how the light hits the bed through the afternoon and ensure that taller crops are at the back, furthest from the light,
Crop choice
I also did not think too deeply about what I was planting and when. I am a firm believer in growing what you love to eat and use, which I did – for example, my family love to eat broccoli – so I dedicated no less than 8 square foot plots to broccoli plants.
That’s fair enough I thought. The problem was most of my broccoli got decimated by white butterfly despite taking the time to supply install insect netting (some old net curtains).
So needless to say, we were left with very little brassica to harvest and I felt like I had wasted 8 square plots for a good few months. Next time, I think I will separate out favourite crops…this is good practice anyway so that if you have to deal with pests or disease, you don’t lose everything in one fell swoop.
I tend to grow from either seeds (earlier in the season) or from online retailer, linky – YouGarden, especially their veggie plugs or fruit trees.
Over the years I have purchased a many veggie plugs, 3 blueberries, a lemon, a lime, orange and an apple tree from yougarden and have never been disappointed. If you would like to purchase anything from yougarden, please use my link. I will earn a small percentage from your order, at no cost to you and will go a long way to helping me to continue to produce content that you hopefully find useful.
Aubergine Fail
I planted aubergine plants in the raised bed but none managed to grow more than 10cm so maybe a plant that needs warmth and must remain in the greenhouse.
Or maybe that failed because they were behind all the broccoli. Who knows! That is something to experiment with this year.
Succession Planting
I had good success with succession planting and I know that mange tout, beans and salad greens work well like this as once the soil warms up, seeds germinate and tried and tested, plants grow pretty quickly so I will make sure I continually have these seeds and starts on the go in the greenhouse.
They can then be planted out once a crop has been harvested and I can make some space somewhere outside.
Mange tout is delicious, versatile to prepare and freezes incredibly well with a quick blanche in boiling water, dunked in ice cold water, dried off and then stored in the freezer.
If done on the day they are picked, they retain their just harvested freshness which makes tucking into them during the winter such a treat.
Potatoes!
First time growing potatoes last year. I had a couple of grow bags where I experimented with a couple of old sprouted potatoes found at the back of the pantry which gave me a few new potatoes 3 months later – so YES!
It does work, but I fear may not be a reliable method.
As a reliable back up, I bought some seed potatoes and planted those too. In my case, both methods worked and wee super low maintenance and easy grows but I truly wish I had grown way more than I did.
I probably only had about 5 grow bags with about 3 seed potatoes in each which did not grant me very many potatoes to be honest. Now I know how easy they are to grow, I will certainly be growing potatoes successionally this year!

How about you? I would love to hear about what others have learned from their past growing season and what they have planned for the upcoming season. Comment below!

Leave a comment